
As one can tell by the amount of time between the last post and this one, I am nothing if not a man of tradition.
Bad habits of not posting regularly enough aside, I

ended up a little distracted with a new side project. Or rather, a project that relates to older ones. Specifically; I suddenly got inspired to overhaul the look of a bunch of characters in the SCoD persistent world.
Planescape is a unique setting in DnD, and has always had an especially unique look to it. On the surface, it’s all dungeon-punk with the expected level of skin and spikes. Yet as with everything in the setting, there’s clearly been a lot more thought- deliberate or accidental- to each and ever characters visual direction. The clothing and armor all related in some way to the settings ‘culture’, as it were.
This connection to the setting is something I want to try and bring in to the server, which has led to a series of design drafts and new kits being made for each of the Factions. This all comes down to having a good means to walk you through the entire process of content creation for the game, as well as general tips for making game assets for other projects.
Needful Things
For the purposes of this guide, you should have access to the following programs:
- Blender 2.8 or 2.9
- Adobe Photoshop (Gimp is a good alternative, but to my knowledge lacks Photoshop’s “3D paint” features. You can still paint directly on a texture file, but it will be slower and more awkward.)
- MDB ClonerA tool used to copy, clone and adjust the texture assignments to MDB files outside of Blender.
Additionally, you will need the following plugins:
- FreshLook’s NWN 2 MDK plugin for Blender 2.8 / 2.9This will allow Blender to import and export NWN 2’s “.mdb” files, which is the format for all of its 3D objects. This plugin will also allow you to import and export the “bones”. As in, bones used for animation, not actual skeleton bones. (Though you could import those as well).To clarify in case there’s any confusion; you want the file called “nwn2mdk-0.10-blender-2.8.zip”.
- Any plugin for Photoshop or Gimp that allows it to read and export “.DirectDraw Surface” (.dds) files, which is the default format for textures used by Neverwinter Nights 2. If for some reason you cannot find one or have trouble installing it, “Targa” (.tga) files will also work.
The Setup
After you have your software all set, there’s one more gnarly step to take before we can get to the fun parts; getting some of the base game’s files out. You’ll want these for both reference, as well as the actual formatting process later.
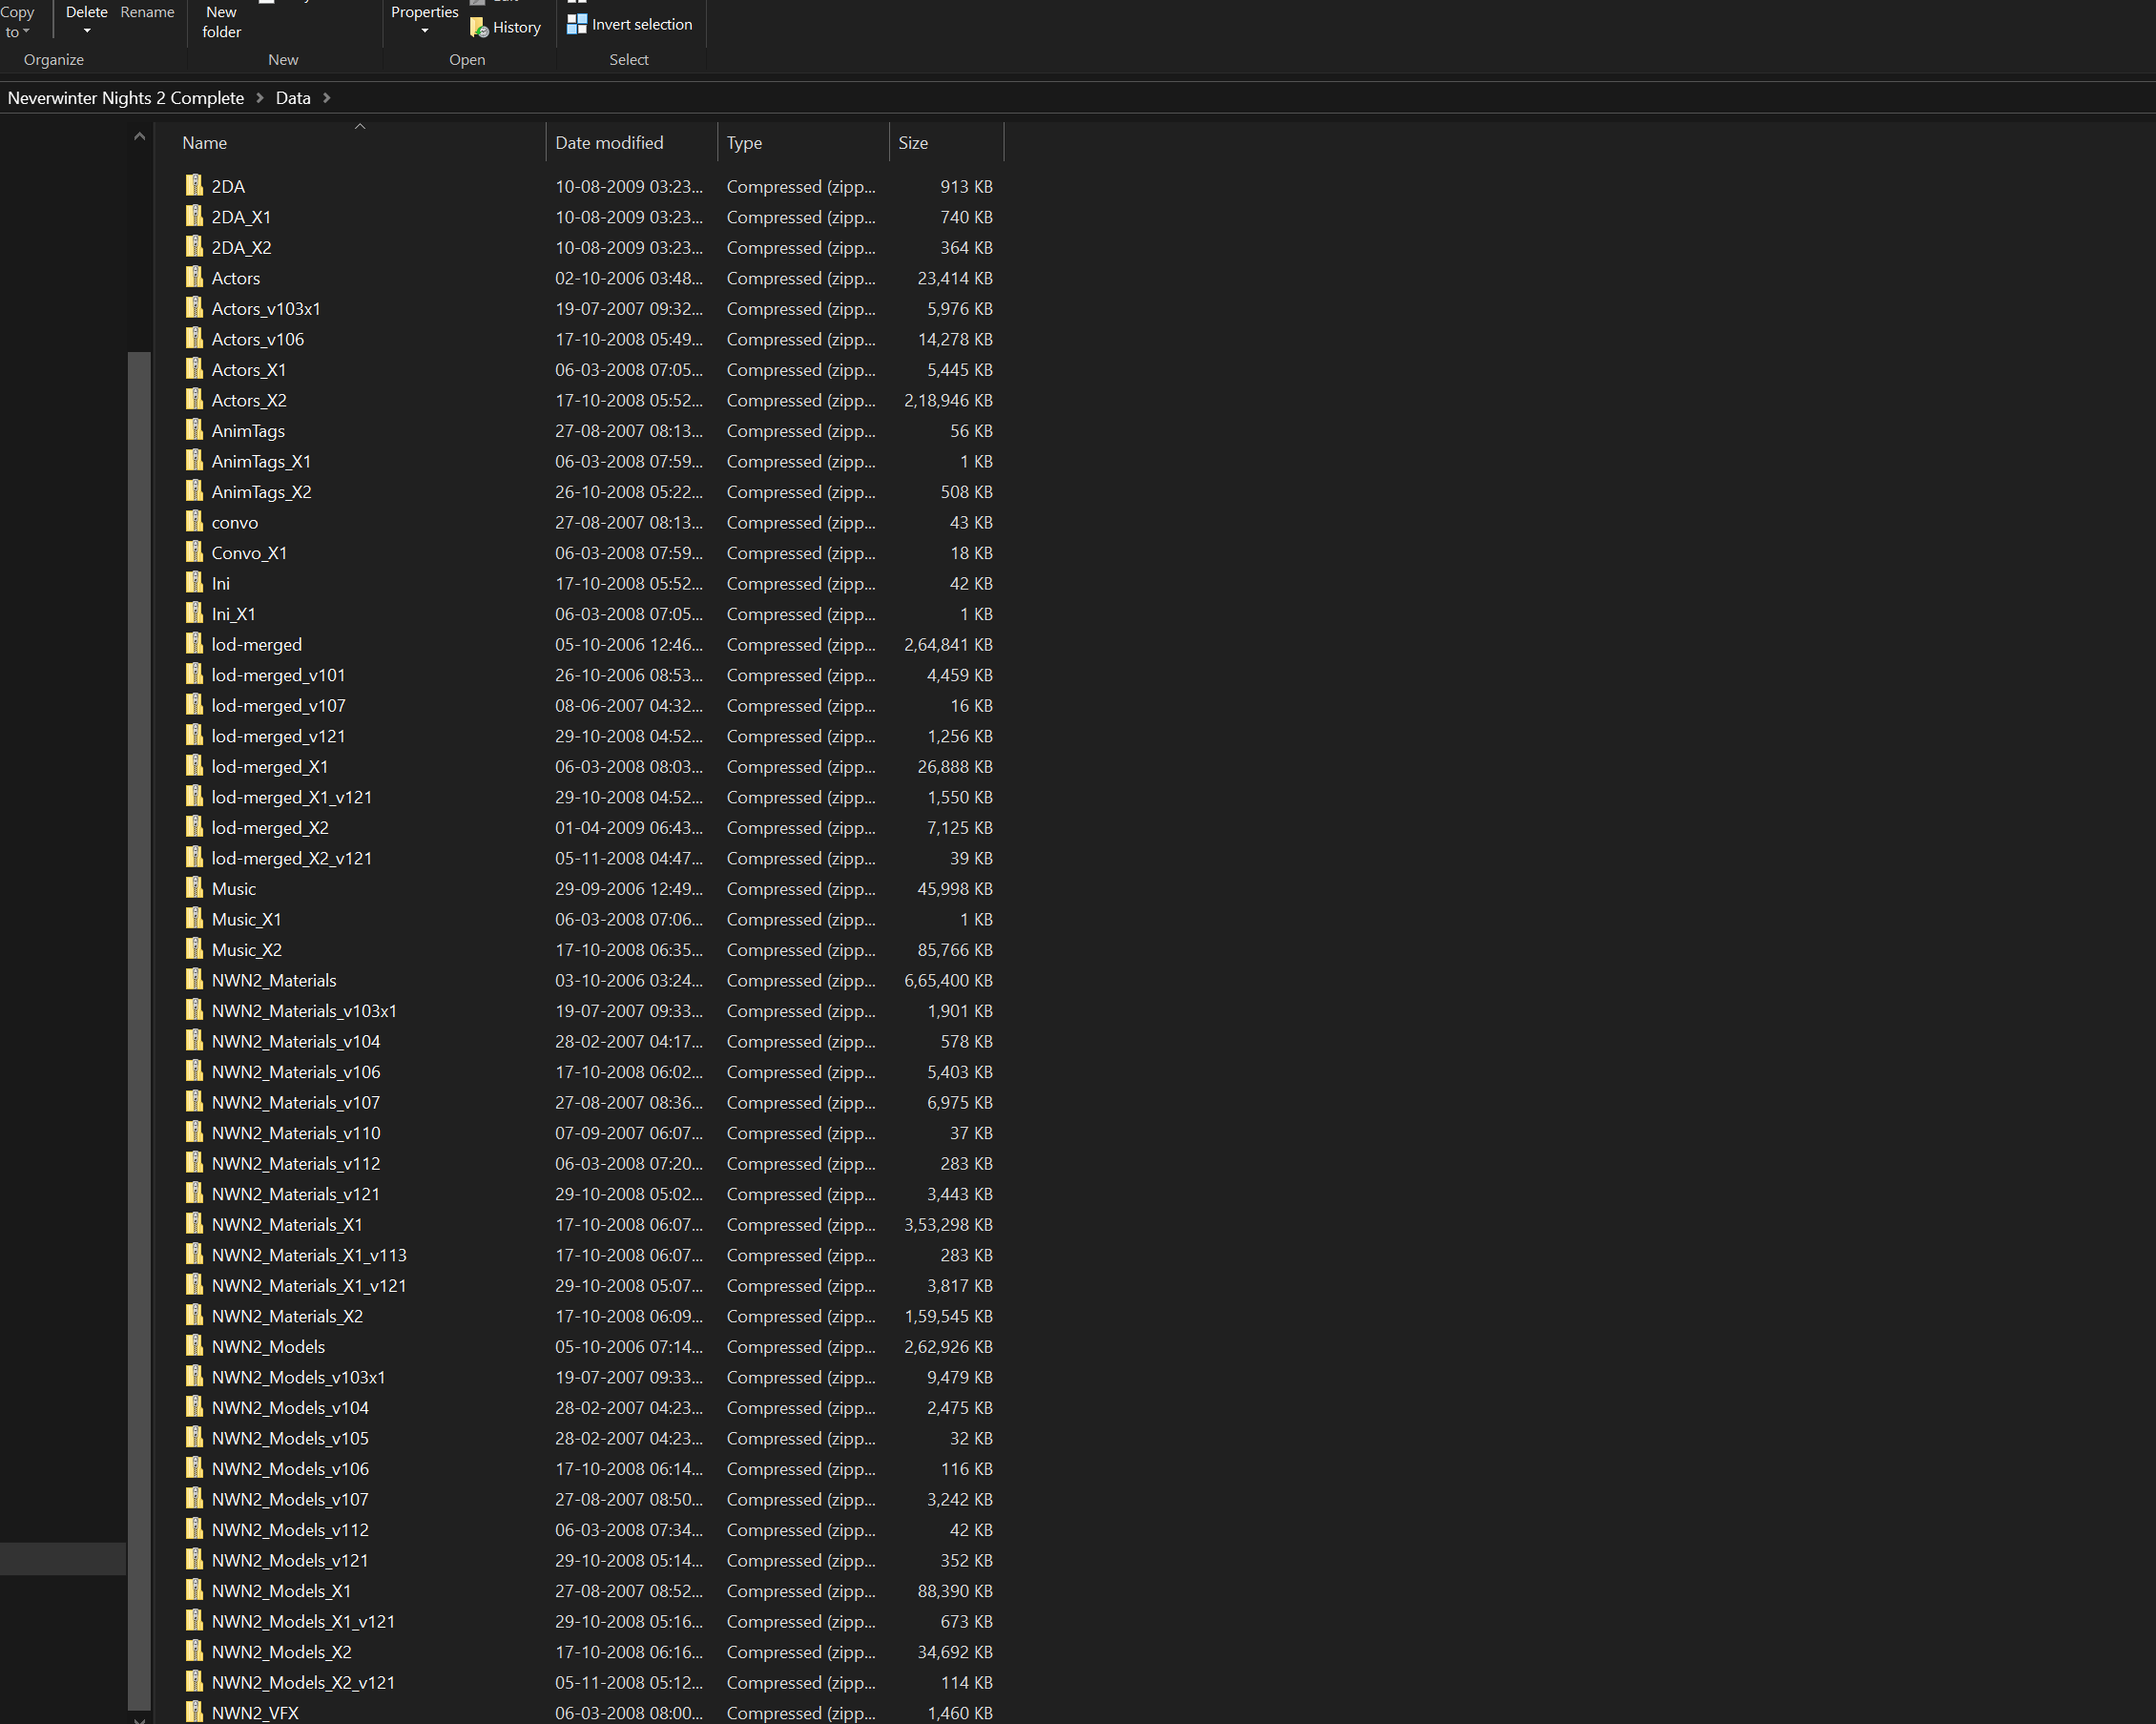
Don’t worry; this looks a lot more intimidating than it actually is. Most of these zipped files are of no concern whatsoever; you only need “lod-merged”, “NWN2_Materials” and “NWN2_Models”. Grab those zip files and extract their contents someplace a little less cluttered, preferably not in the install directory of the game.
The contents you extract from each of those files should be self- explanatory, but for a brief overview;
- LOD Merged has the Granny 3D (.GR2) files, which are those bones I mentioned earlier. These are required for any custom asset that has to adjust its shape during animation (Helmets, body armor, gloves, etc). These are not required for accessories such as bracers, shin guards, shoulder pads or anything in that list. Additionally; if all you intend to do is re-texture an existing model, you wont need to worry about the GR2 files at all. For the purposes of this guide, however, we will need them.
- NWN 2 Materials contains most of the base game’s texture files (the types of which were covered in the last post). Note
- NWN 2 Models is exactly what it says; the file that contains most 3D models for creatures and gear.
Note that for all of the above, the ones with “_X1” and “_X2” in the name are folders that have resources which were added to the game via “Mask of the Betrayer” and “Storm of Zehir”. For the purposes of this guide, just grab the ones with the simple names. No “Vxyz” or “X1” or “X2”.
In the Mouth of Madness
Before we go further, there are a couple more things to note about the files in those folders.
All models in the game follow a strict naming convention that denotes their function. For example, monsters and other models meant for background NPC’s and animals tend to be listed as “C_[race name]_[armor category]_[armor part number]”. Player models, meanwhile, are listed as “P_[race/ gender abbreviation]_[armor category]_[armor part and number]”.
The “Armor category” and number are important, as they will enable you to switch out appearances in the Neverwinter Nights 2 Electron Toolset (as well as any appearance changing scripts being used by your module).
To narrow down the example a little more, say you want to find the very first scale armor body for human males. Said file can be easily located in the folder by looking up “P_HHM_SC_Body01”. “P” being the standard identifier for “player”, “HHM” being the race and gender, “SC” the category (scale), and the last line stating that the mesh is a base body with the corresponding number.
NOTE: A quirk of the NWN 2 engine is that body mesh files will always show up in the tool set as one number lower than the file name. Thus, the above example will actually show up in the editor as scale body 0, not 1. This quirk does not apply to shoulders, bracers and other such accessories. It does, however, apply to helmets, belts, cloaks, boots and gloves.
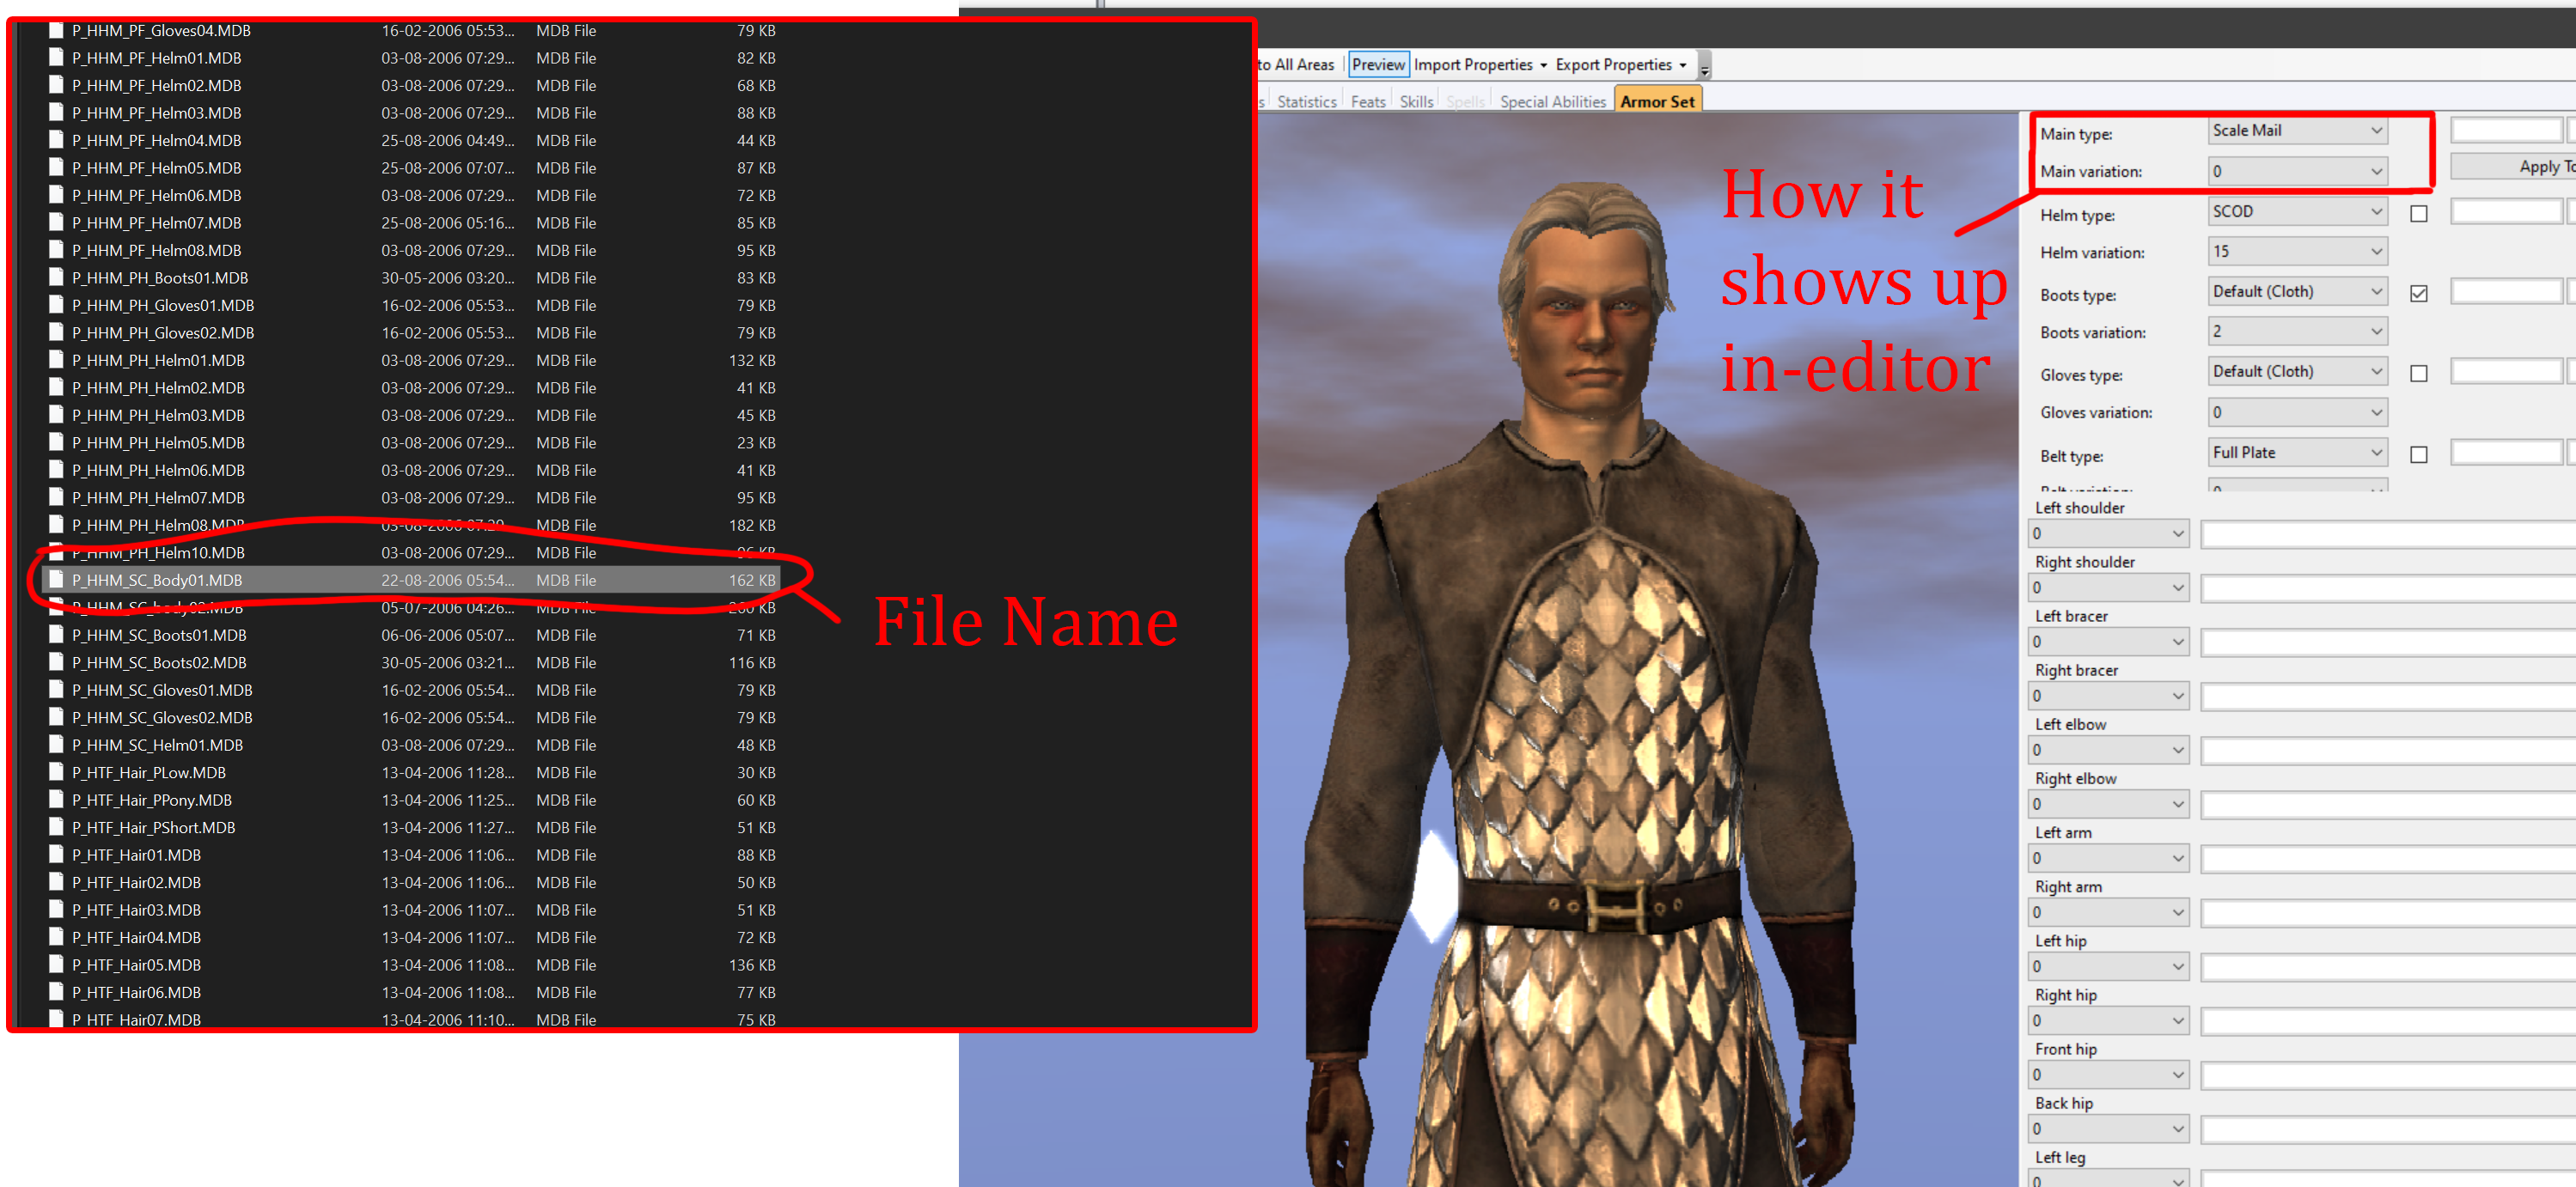
Aside from the main “race and base armor” designations, there are also two other categories that pertain to creatures and players:
A_[race and gender]_[accessory type and number]: Accessories, such as shoulder pieces, thigh pads, hip hangings, and bracers (NOT gloves, those follow the “P_” convention). As noted above, accessory file names are accurate to how they will display in-editor. Thus, you do not need to name the file one higher than it’s intended listing.
W_[weapon type abreviation and number]_[a/b/c]: This is the naming convention for weapons, as you probably guessed. The middle part of the name indicates what type of weapon it is, while the last denotes the specific part (if the weapon has multiple parts, such as different tops, handles, etc).
The Mannequin
Now it’s time to setup the actual 3D workspace in Blender. If you’re making a mesh from scratch (or just modifying an existing one), it’s a good idea to have a “mannequin” in place. That is; a set of at least one body and head to measure the size of objects against. For my helmet and accessory project, I opted to grab a tiefling male head, and human scale armor 01 body.
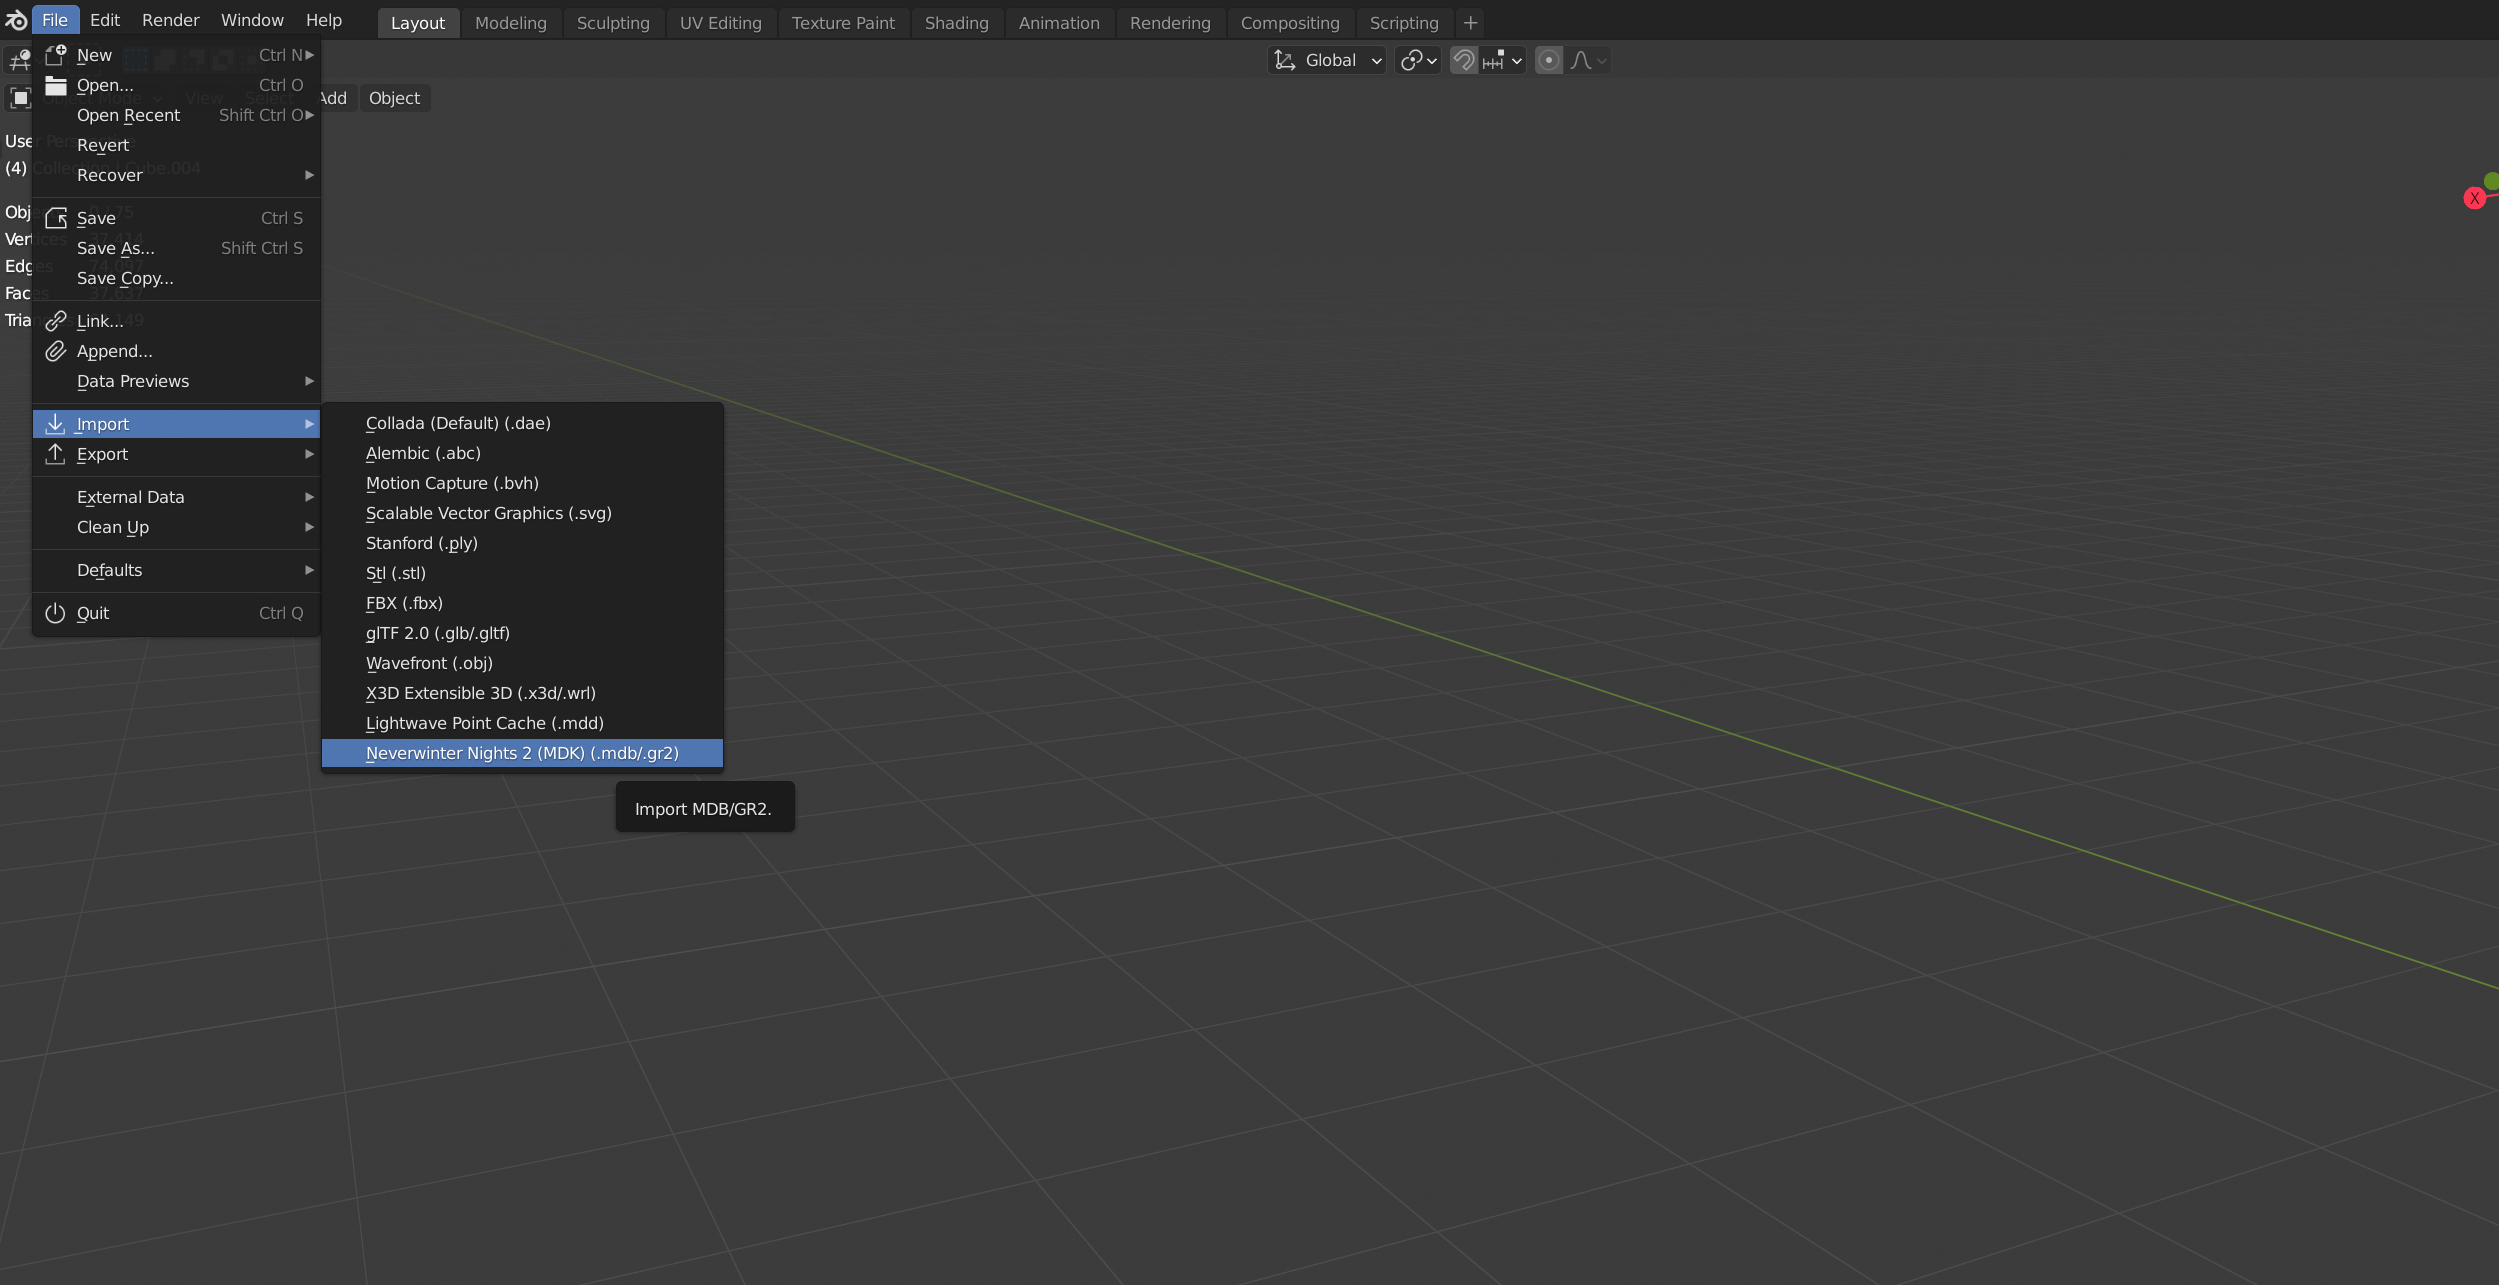
Once you have your resource folders extracted, go ahead and open Blender. If you haven’t already, install your plugin, then access the drop down the File menu, and select “Import Neverwinter Nights 2 (MDK).(mdb/gr2)”, as shown in the image bellow.
For the moment, don’t worry about importing a GR2 file with the base mesh. That can be re-imported later when it’s time to make sure things are “skinned” for animation. At this point, all you need is a base reference.
Let’s start with importing the aforementioned Scale armor body, which is the same one noted earlier (P_HHM_SC_Body01).
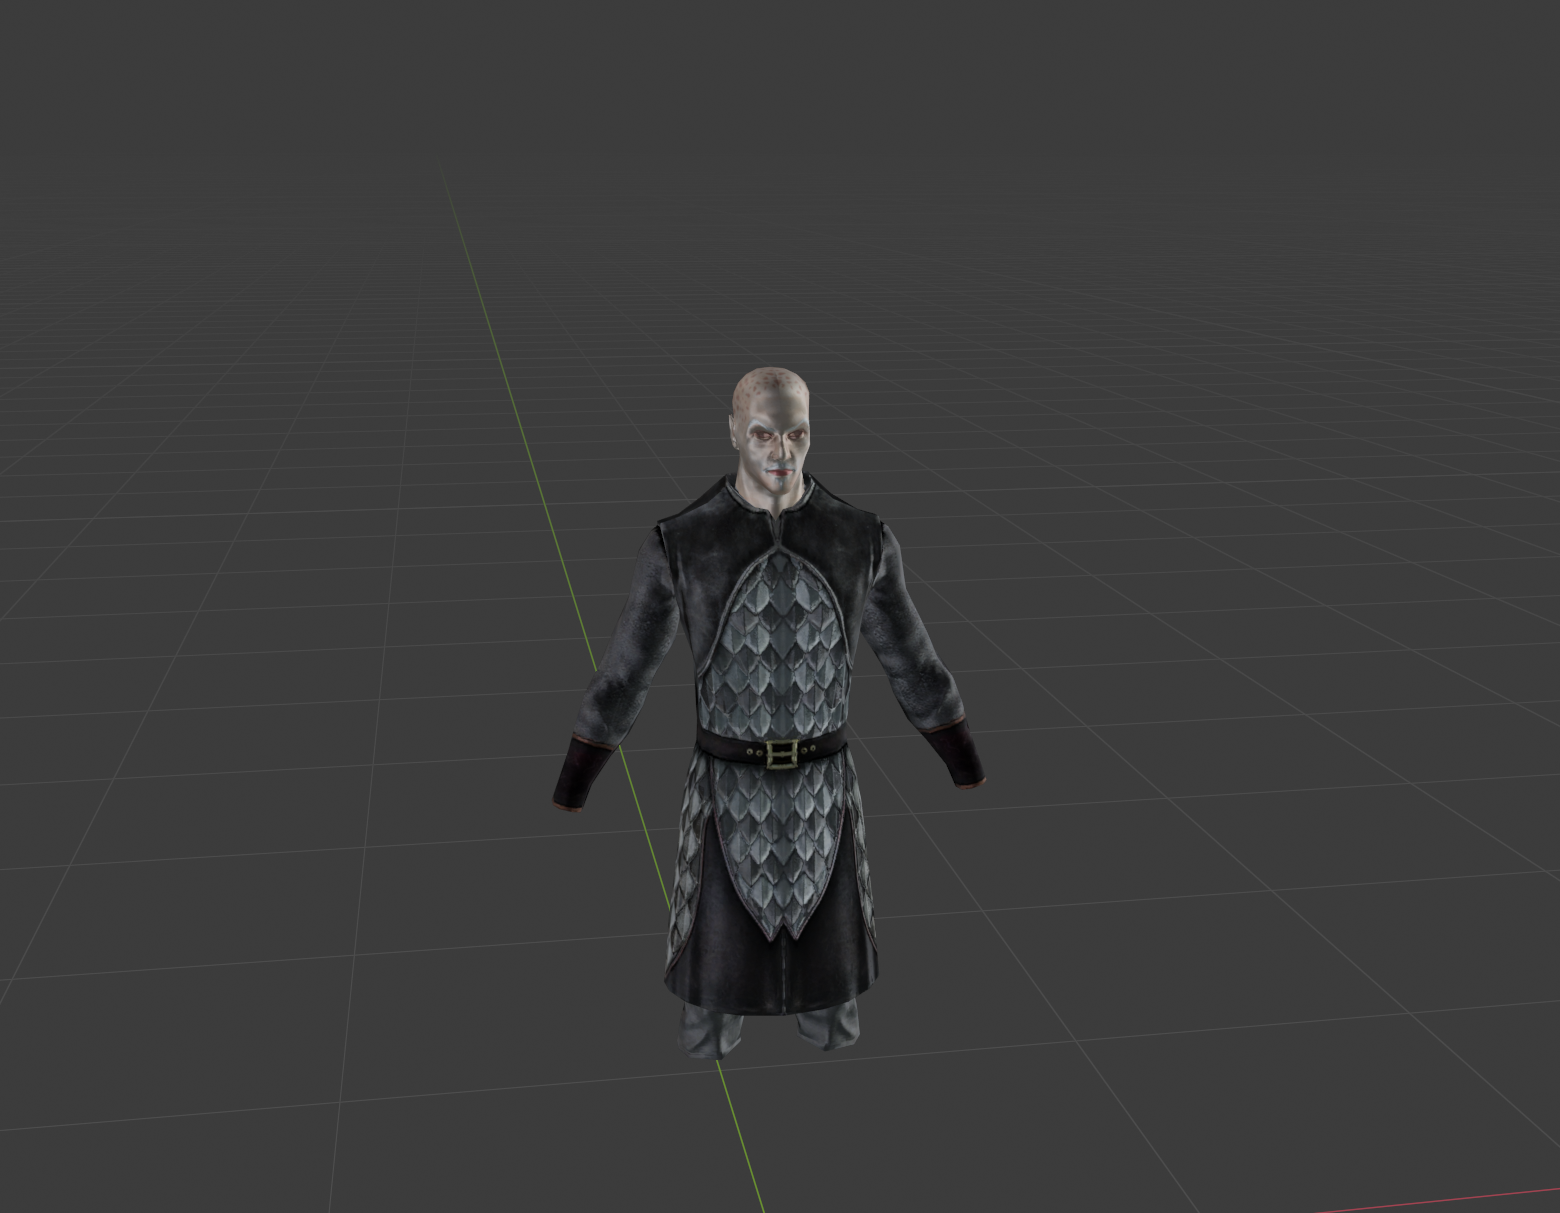
You should land up with a scene that looks like this.![]()
Don’t worry about how messy it looks. What you’re seeing is three distinct models, one for each “level of detail” (L.O.D), all pushed into the same place. L.O.D models are versions of a mesh that have fewer polygons than the ‘main’ one. Games such as NWN 2 will use them to render objects that are far away, so as to reduce system load. They are non-critical to the function of the game, however, and in a lot of cases you can ignore the need for them completely (so long as your final output isn’t insanely heavy on the poly count). In any case, they aren’t necessary for the purposes of having a frame of reference, so go ahead and delete the objects labeled L01 and L02.
You can also have Blender display the models assigned textures by clicking on the Material Preview button.
Repeat the same process with a human (or tiefling) male head of your choice. You can also go ahead and delete any eyes that come with it.
It’s Construction Time!
With the workspace now set, we can finally start with the fun stuff; the actual content creation!
(Next post. I promise I’ll try not to wait a thousand years before posting… )
Be First to Comment