
I’ve been musing about doing an ‘Acorns Above” retrospective. Or, as the case was, the tale of how NOT to make video games. However, it is Monday, and a particularly cold Monday at that. So rather than depress myself further by going back to darker days, I figured now was a good time to discuss my most recent dabble into 3D animation.
A little clarification may be in order. Contrary to the assumption many of my acquaintances used to make, I am -not- an animator by trade. I know -how- to animate in both 2D and 3D, and I do indeed work on both when needed. It is not, however, my greatest strength, and much like game graphics in general, I’ve had to teach myself how to do a lot of it from ground up. Which is to say; today’s post may not be the biggest help to those of you who are, by trade, Animators. Instead, my hope is that it will be illuminating, in some small way, to others like me who dabble on an as-needed basis. Indie developers, people just starting, etc.
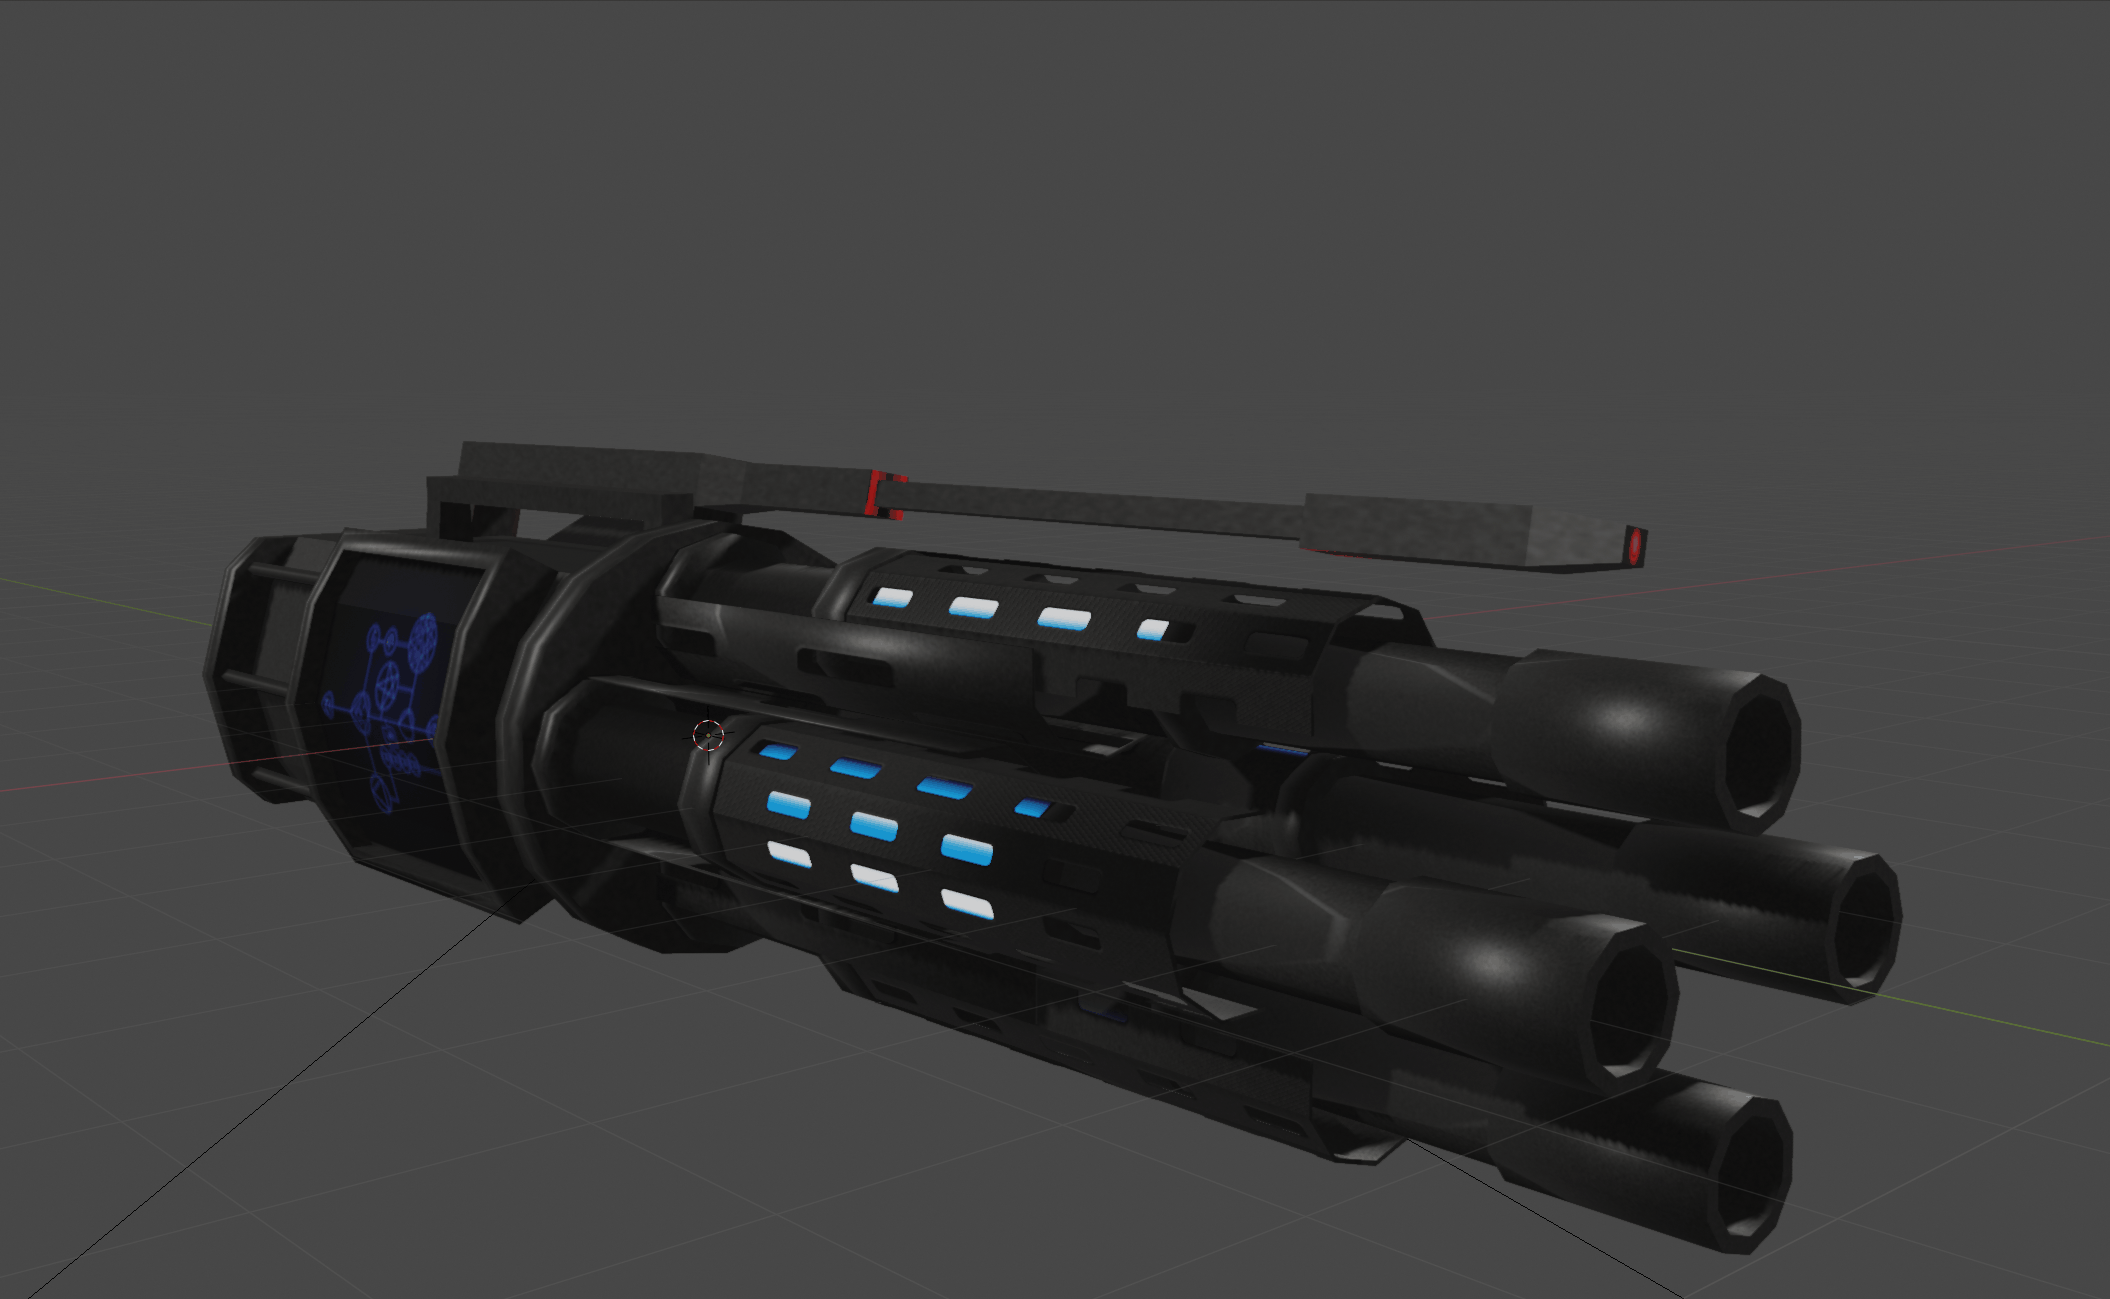
So, without further ado, let’s move on to today’s subject; the multi-barreled plasma cannon for our Scavenger craft.
The Background Story
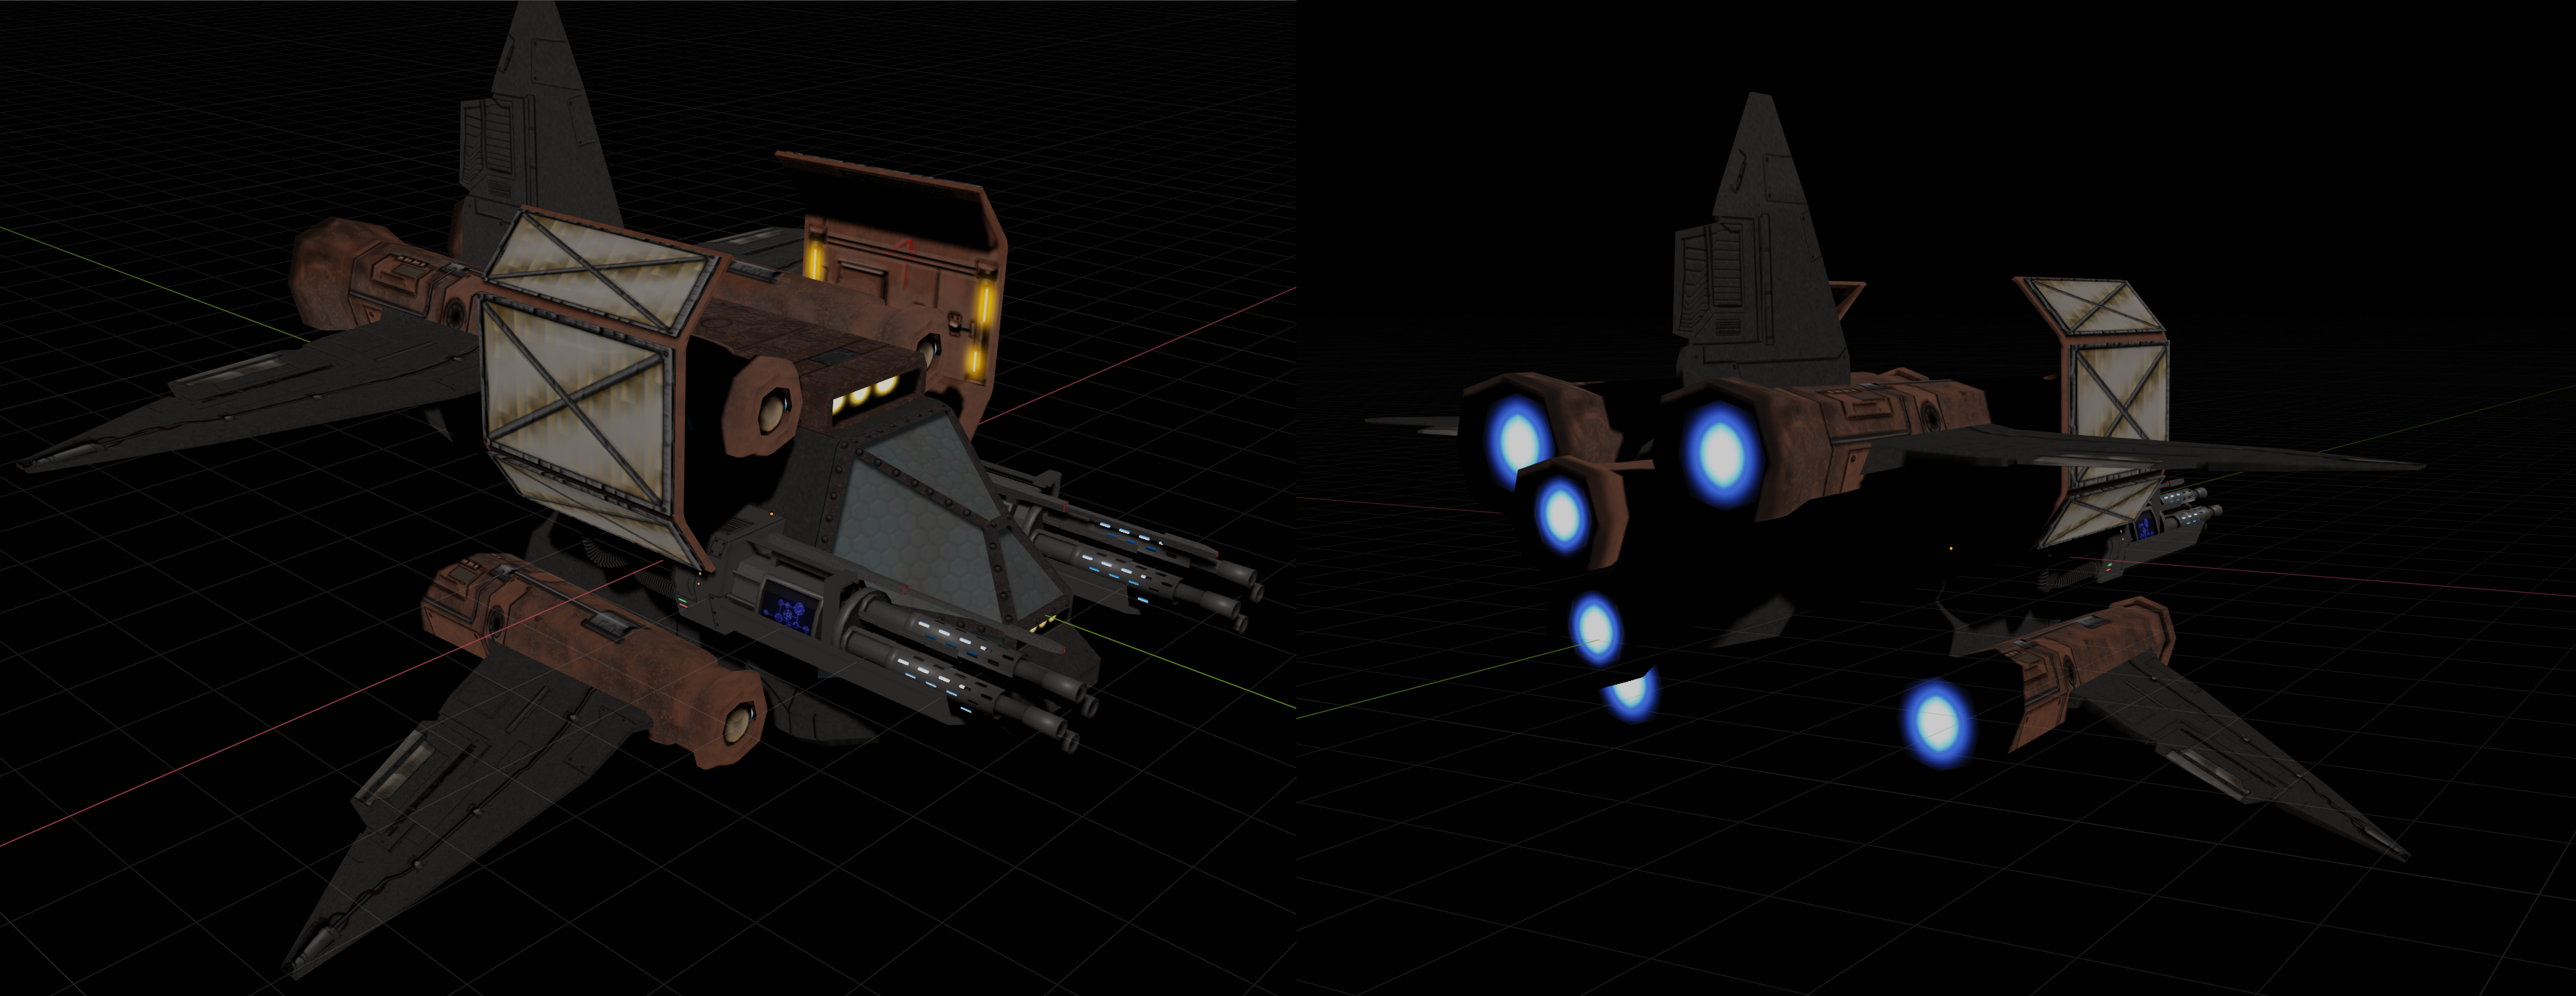
The cannon will be used in pairs, and mounted along either side of the player’s ship. We also wanted the weapon itself to be visible, to give the player more of a feeling of being surrounded by heavy machinery. Also, let’s face it; wielding big giant Gatling guns becomes more awesome when you actually -see- the barrels at work.

The idea is to give the act of firing a little more of a visceral feeling than you’d get in a situation where the cannons were hidden from view. A little motion to disrupt the otherwise still nature of sitting in a cockpit. As we progress, we will be adding muzzle flashes, projectiles and a little more shake to the players view. Today, we’ll just focus on the preparation of the cannon asset itself.
To accommodate the above, there were a few important points to keep in mind. Number one, of course, was the actual motion of the barrels themselves. To support the end result, however, it was just as important to have parts that were -not- moving be visible. The rod on top (with the little red light), as well as the support underneath the barrel in the cockpit view, are both meant to give the feeling of a larger machine, rather than just having a single chunk rotating in place. Giving each barrel multiple shapes, and having single parts move independent of the rest of the device was also done to add a sense of complexity. With all of that said, this is, at the end of the day, supposed to be a quick asset. There can’t be too many niggling details that require tons of work.
Barrels O’ Fun
The back of the weapon is, for the most part, unimportant to this experiment, so any details (either in mesh or texture) were more or less an afterthought. The main objective was to make the barrels interesting.
I ended up deciding to rely on three points. Air-holes over half-cover shells encasing different parts of the barrels was not only meant to add a bit of disruption to the shape, but also to highlight the guns motion later. Signs of energy glows seeping through said holes was also planned to enhanced a sense of depth. Finally, as noted before, a set of motionless parts to contrast with the motions was added at the last.
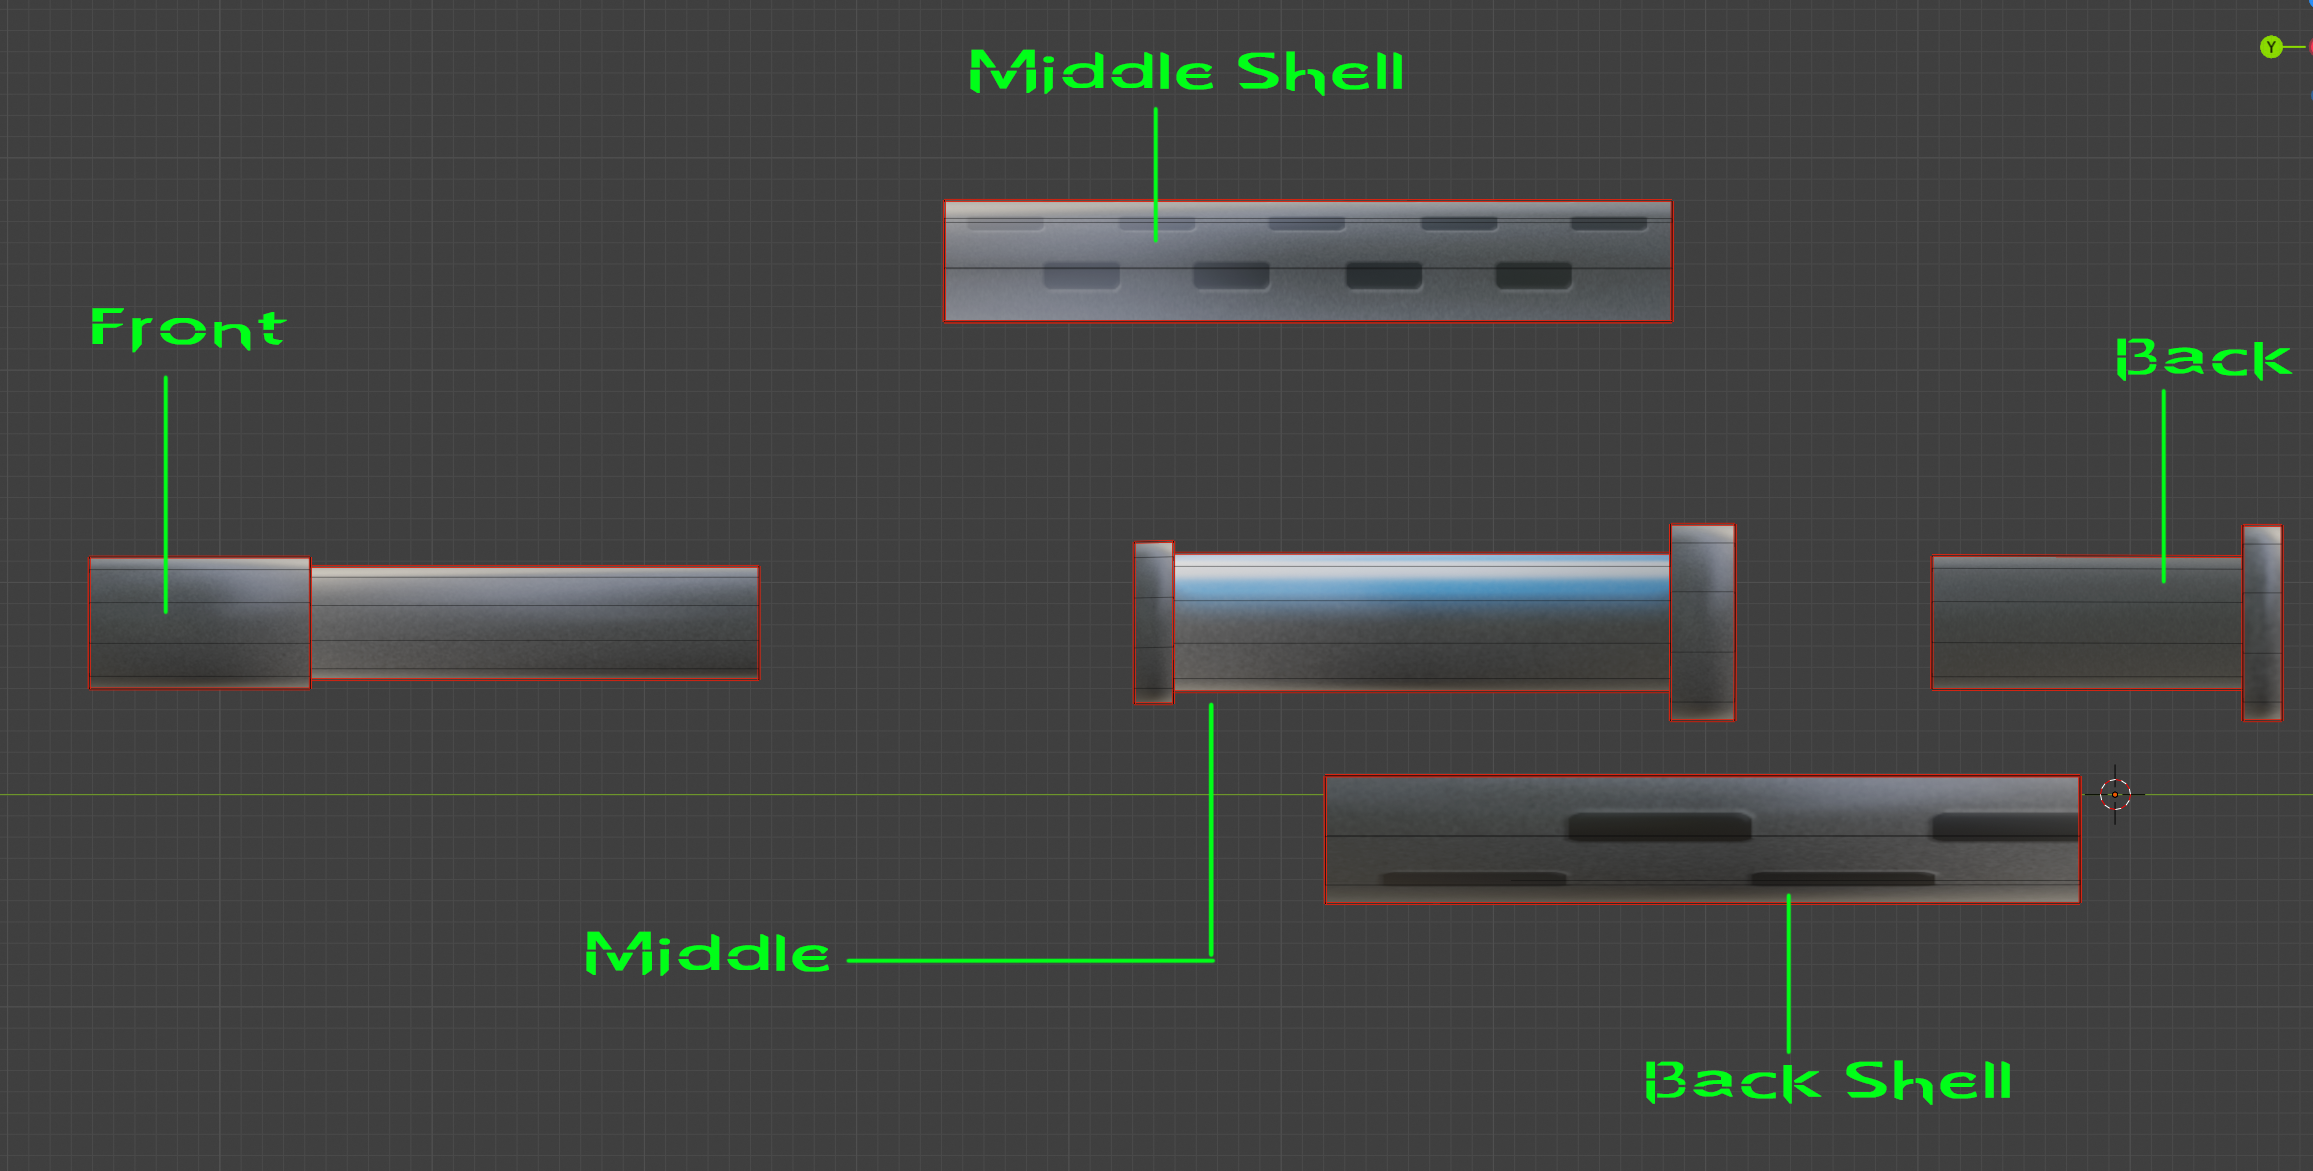
All of this may sound more complex than it actually was to make. Only one barrel needed to made at all, and though it was built in separate pieces, the individuals parts are relatively simple objects.
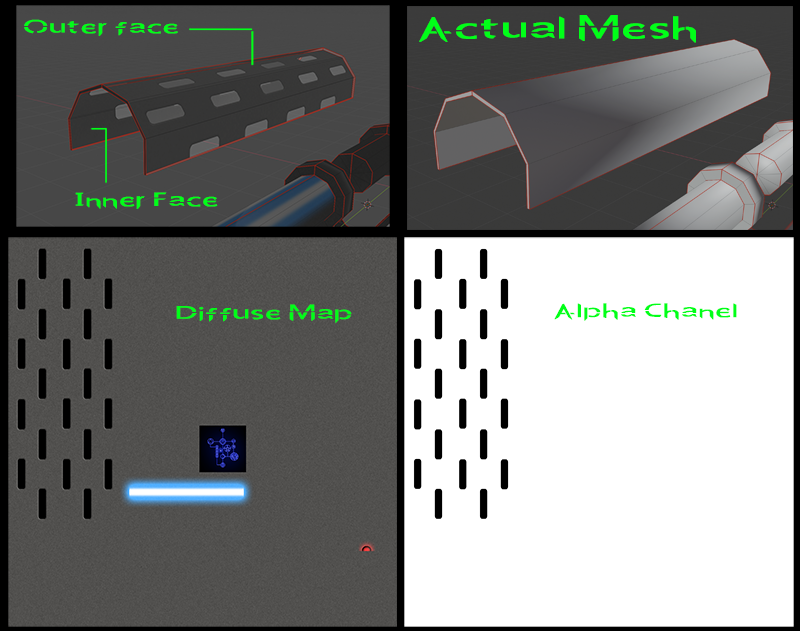
The shells were the most detailed part of the barrel segments, though they were also arguably the simplest. They rely almost entirely on the alpha channel of the texture. One thing to note is that it has poly’s on the inside, as well as outside, rather than either being a solid cylinder, or a single sided object. The reason for this is so that we can see the inner part from the outside, and vice versa. It also lets the viewer look at the model from any angle, while still getting a sense of width, without the alpha clip betraying the fact that the shell is basically a thin sheet of paper. The inner face’s are a copy of the outer group, with its ‘normals’ (that is, the direction of the polygons) flipped. he result is that the inner and outer shells line up reasonably well.
Glow sticks, because Sci-Fi!
After completing one of the shells (and then copying, flipping and resizing accordingly), I moved on to the middle barrel. This section will mostly react to the top barrels motions, and most of the mesh will be hidden behind the shells. However, it will provide an important detail by way of the glow map running along its length.
In hindsight, I missed a big opportunity to have the rod move independently of the shell. This would possibly have given a better sense of motion. I’ll save that adjustment for another time though. For now, the idea is to simply give the impression of more at work. As I iterate over the texture,I’ll likely add a few more details to better convey the notion of this being an energy rod inside the mid section. I am also toying with the idea of having the glow map alternate between a “ready to fire” and “cool down” glow, though again, this is a matter for later.
The rest of the pieces are fairly straightforward. For the purposes of this test, they require little actual detail at this time.
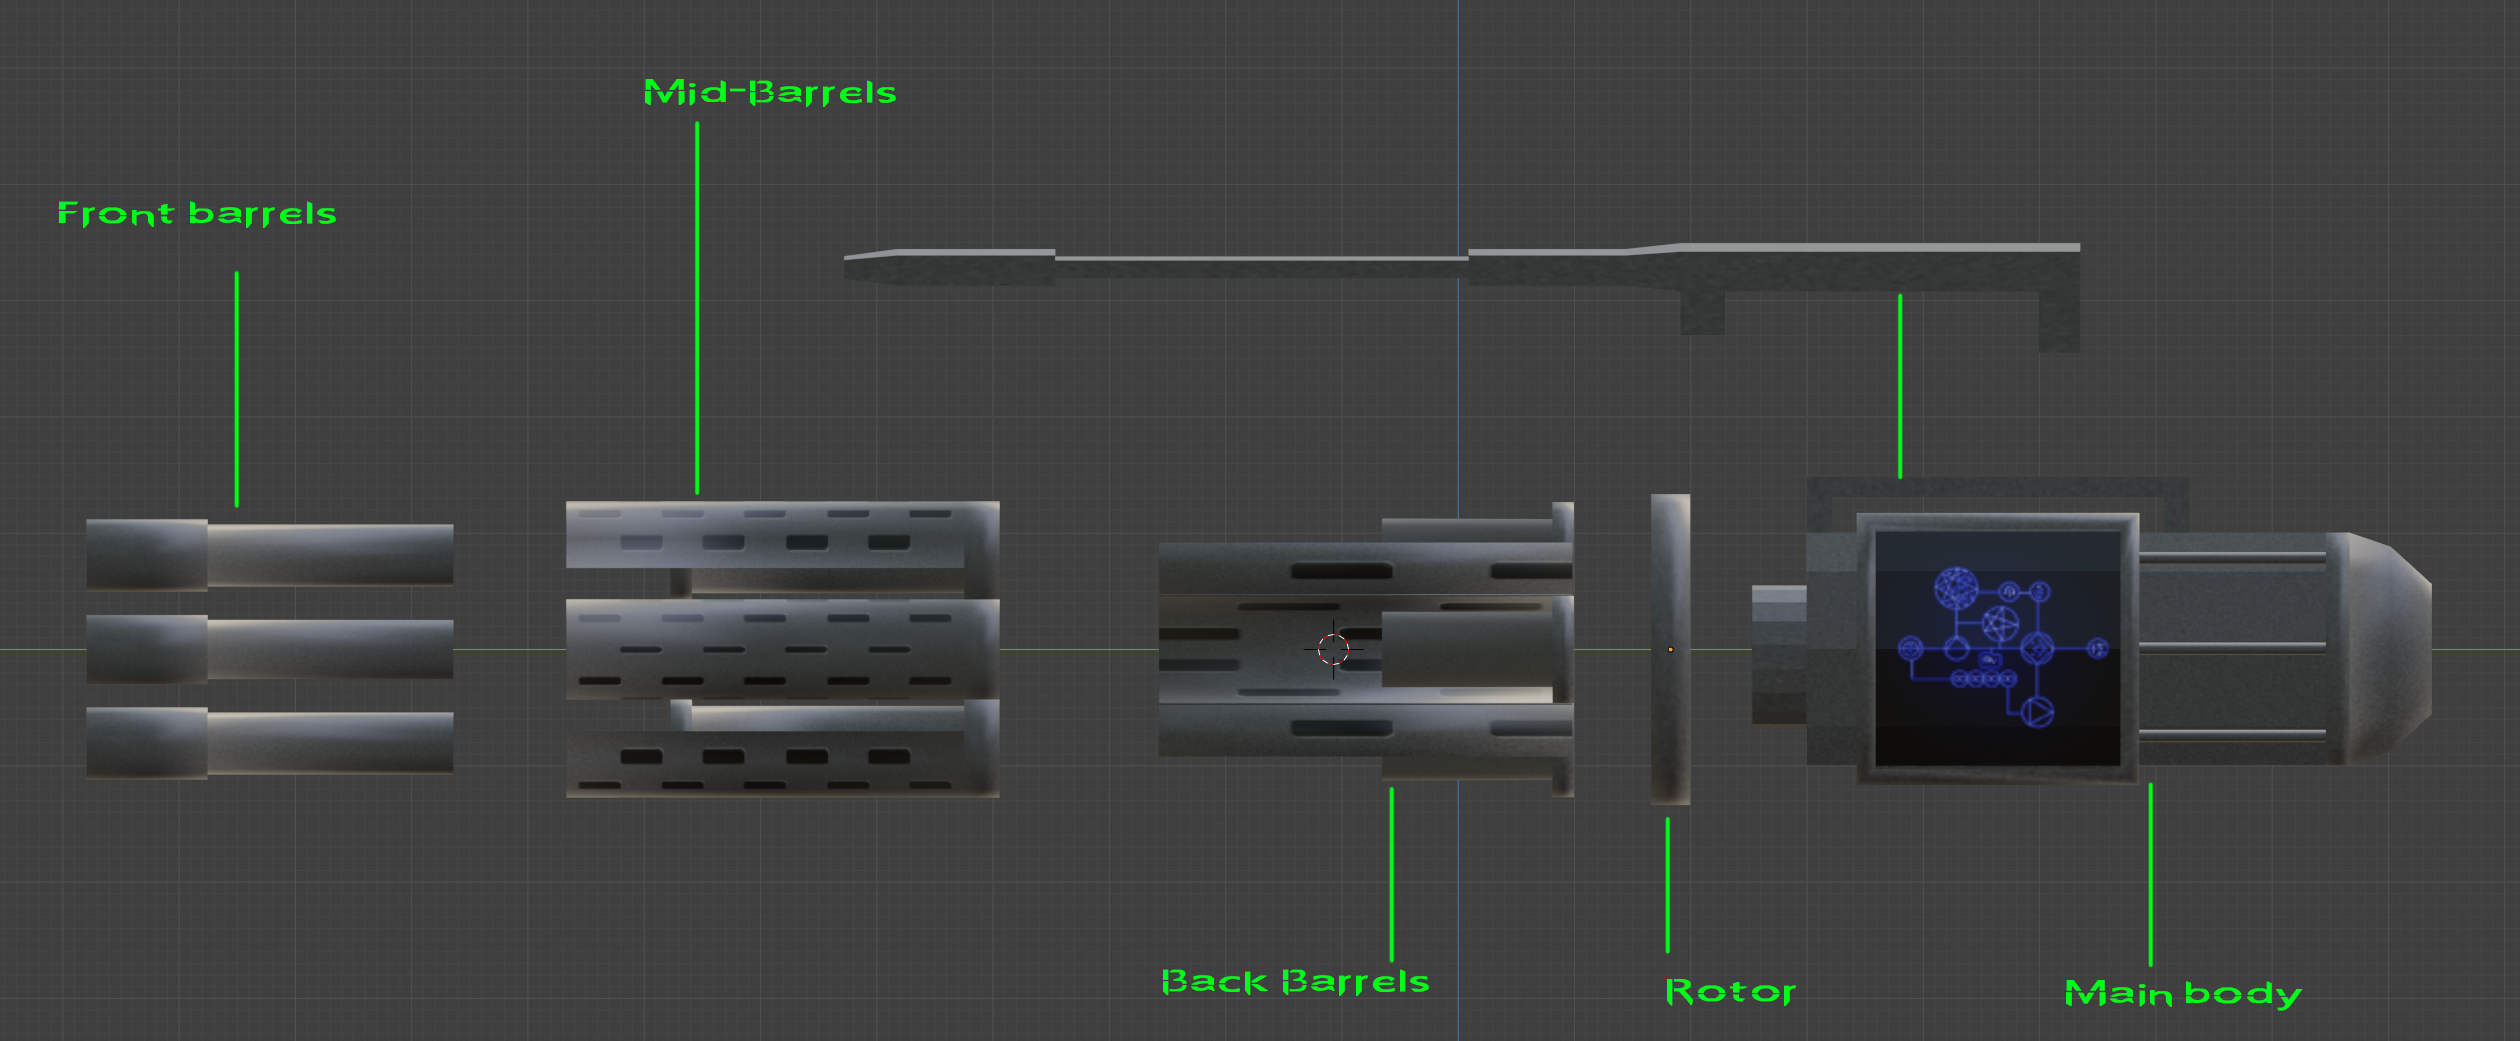
The next step was to merge the shells with their respective barrels, followed by the rest of the cannon. The
main body is split into rotor and main body. The rotor is just a simple cylinder, and meant to serve two main purposes. First; it will provide the center point upon which we clone the barrel pieces. Second, it is the attachment point for the back-most barrels, which do not need to blow back after each shot.
The single barrel that was made was then aligned with the rotor. The pivot points were all set to the center of the cylinder. A ring of copies were made.
Consolidation and bones
Three of the four barrel were rotated, each at 90 degree turns, along the axis of the rotor. Once set, they could be merged together and with the rotor itself. This was just for the sake of organization, and was possible because I only need one of the barrels to actually move. The rest just need to correspond to the rotors rotations.
Once everyone was finally fused, it was finally time to move on to the bones. Bear in mind; this is likely not the most optimal way to animate an object like this. I mostly went with the use of bones because of my passing familiarity with their use, as well as the fact that it did help automate certain parts, which we’ll get to in a moment.
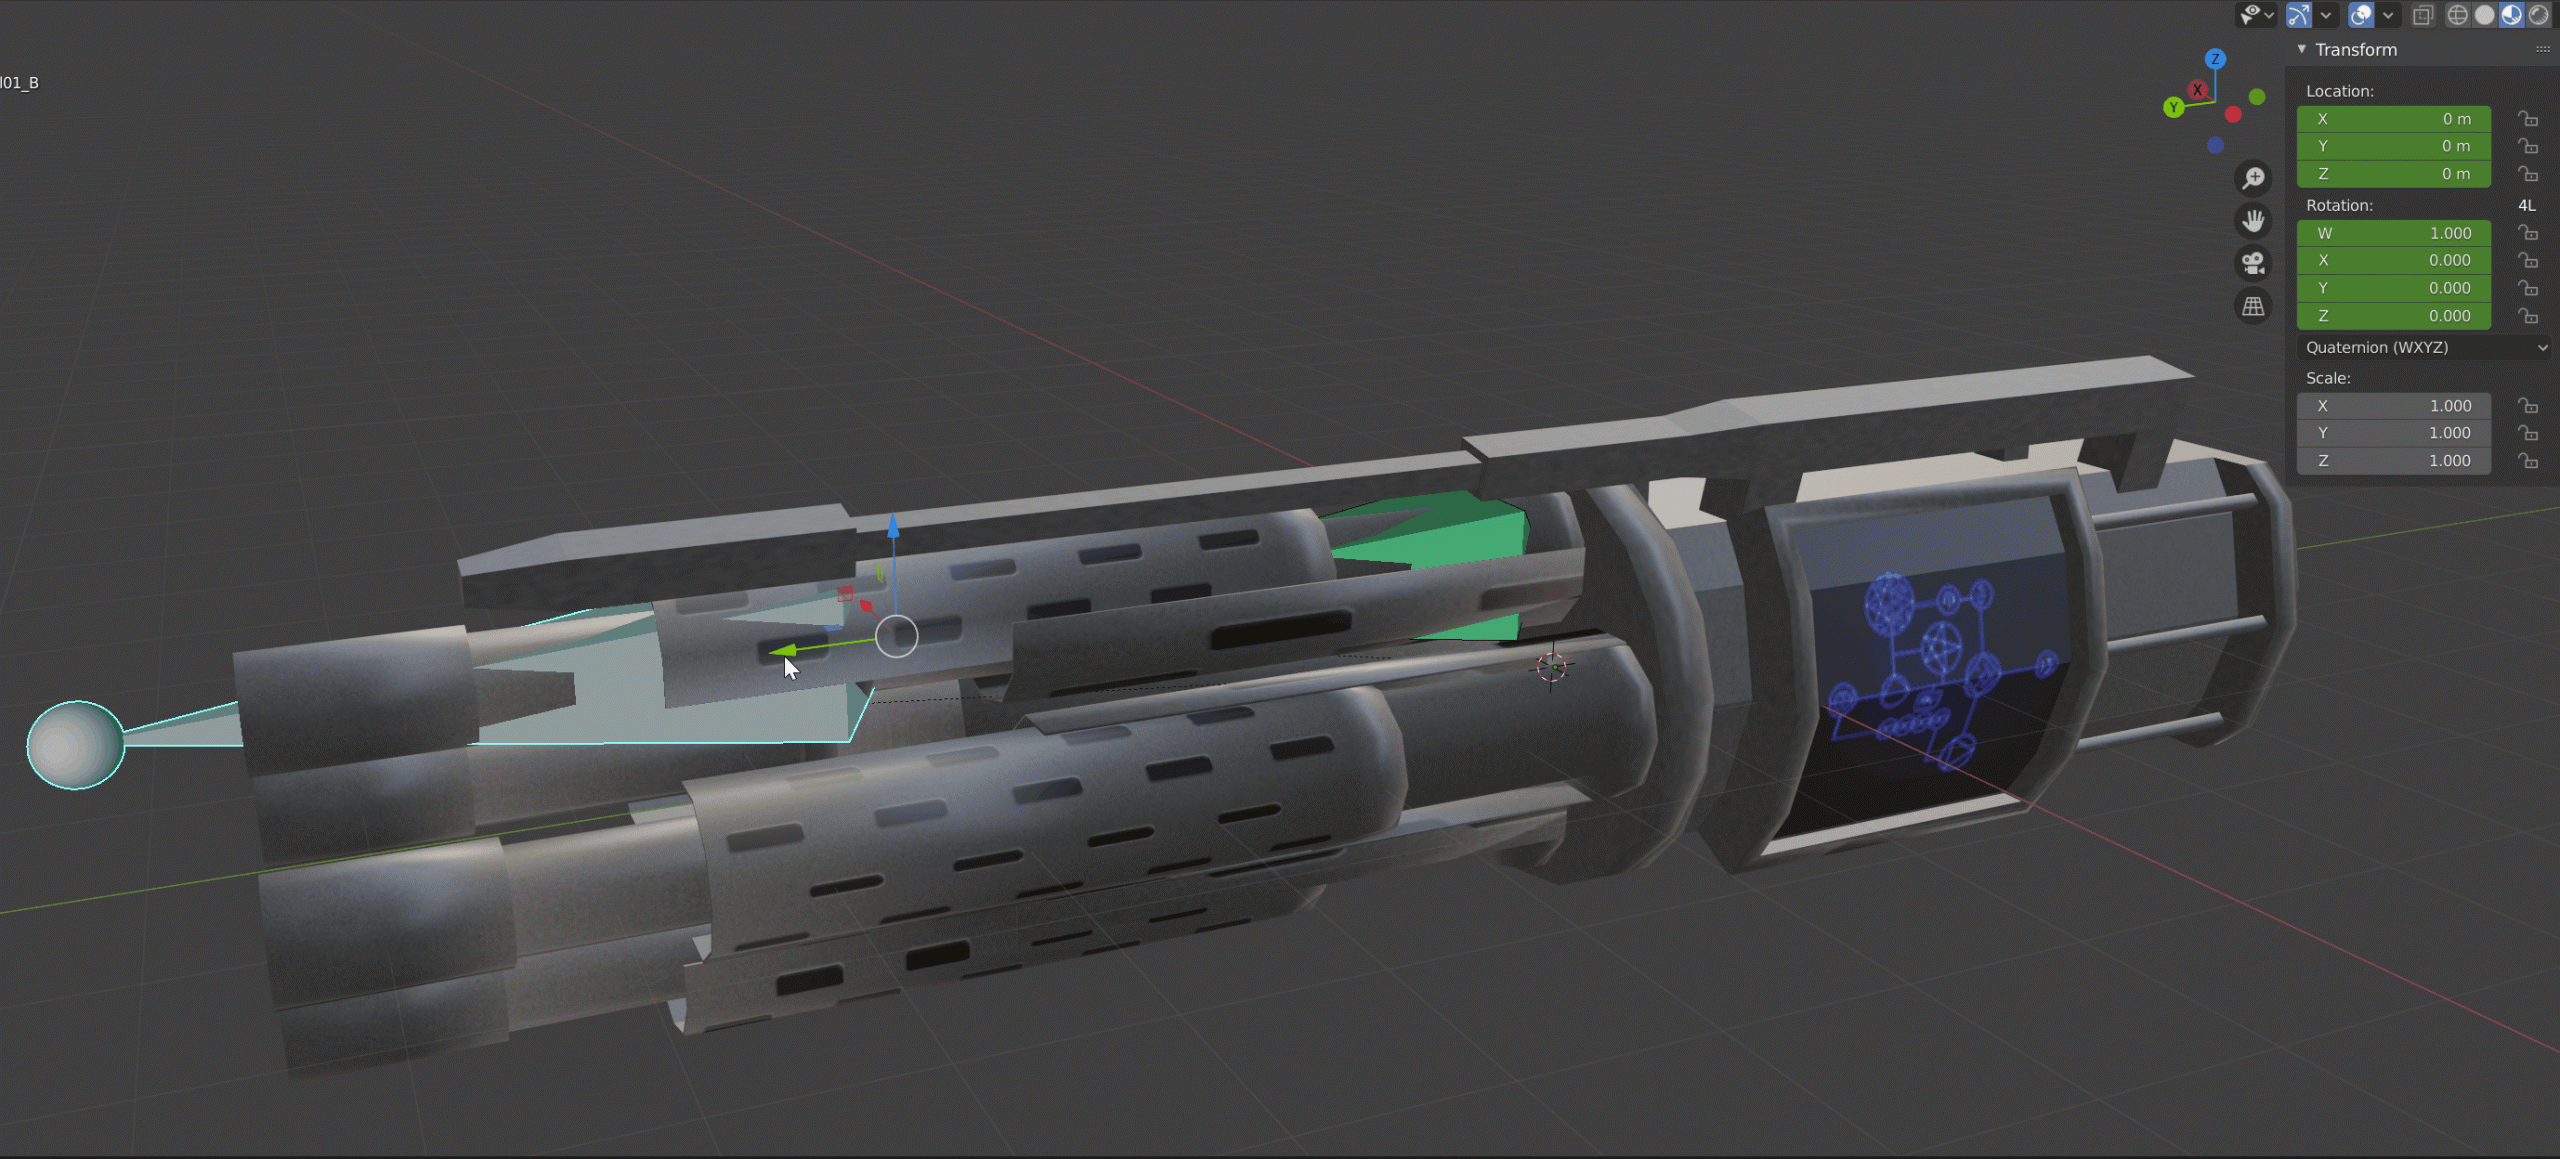
The cannon has four bones; the Root, the Rotor, the middle barrel and the front barrel. The Rotor is fairly self explanatory, and will control the cycling of each barrel after a shot. The middle barrel will be set to react to motions, rather than directly control anything, where as the front will be the lead in the actual firing animation. Both barrel bones are parented to the rotor, which in turn is linked to the root.
Next, I went ahead and assigned the middle Barrel bone a “Copy Transforms” function under Bone Constraints.

This will make it so that when the front barrel moves, this bone will move in degrees according to the influence set. The result is that the front barrel can be blown back to whatever extent desired, while the middle will automatically shift to an appropriate distance without requiring manual adjustment.
Work, work , work…
This may sound like a lot of legwork for a fairly simple animation. The alternative, however, would have me manually animating each section (front, middle, and rotor) individually. Which would be fine, but it would also mean any further adjustments would have to be made from scratch, for the whole system. Allowing parts of the machine to automate, even just one, simplifies the work from here on out.
Once the bones were set, the actual meshes were assigned to each. Unlike character models, there was no real need to get into skinning. For the moment, I could get away with simply parenting mesh to bone, as no deformations are required. Expect another blog post in the near future if I discover that this was the very worst thing one can do for a Unity object. With that said, again, this is why the bones were set up the way they were. It will make future field repairs that much less painful.
Move it!
In any case, the next step was to get the actual motions going. The firing sequence is supposed to have the barrels blowing back from a shot, and during recovery, have the rotor cycle over to the next barrel. According to the games reality, the gun will cycle all four barrels, one at a time, per shot. In practice, we only need the weapon to cycle -once-, as each set is visually identical. The viewer will simply not notice the gun snapping back to its original rotation, which is why we only kept the top barrel split up, and why we only have one barrel bone set.
The front was animated to push back till the end reached the middle shell, which is moving at a slower rate thanks to the Copy Transform function. Following this is a recovery phase, in which the front bone returns to its initial starting point. The initial push back is only two frames, while the recover is a considerably longer eight. The hope is to convey a sense of force on the initial shot.
During the recovery phase, the rotor bone is also assigned a rotation of ninety degrees, mimicking the rotations of each copied barrel. This ends up shifting the closest copy to the exact same position as the firing barrel. The result is that we end up looking at more or less the exact same starting point, which will hide the ‘snap’ back to frame one.
And there we have it! The mechanical systems are all set. The texture’s are still a ways off from being complete, but the asset itself is ready to be brought into the Unity engine, where we’ll add muzzle fire and other spiffy effects. The results of that will be posted soon.
Be First to Comment